

I originally made this blackberry pavlova for a blog post waaaaay back in 2012 as a part of a larger dinner party post with a few other old recipes. Like many of the posts I created back then, the food was good, but the recipe writing needed improvement, and the images weren’t what I’d call my best work. But, I like having some of those old images around because they show how far anyone can come at any task (given lots of practice), so I have a few of them at the bottom of this post (Brace yourselves!) 🙂
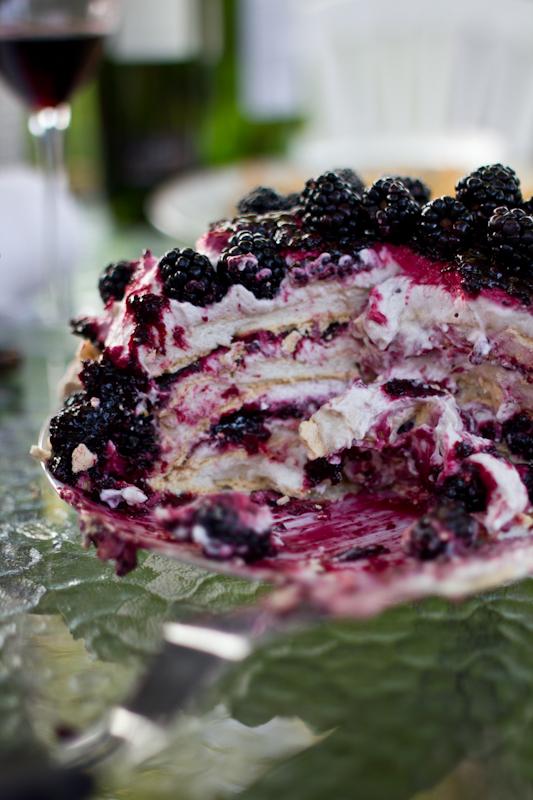
 Originally, I’d made this as a multi-layered pavlova rather than a single one. But since pavlova’s meringue base makes them a bit fragile, I didn’t like the idea of the weight of the toppings crushing all the beautiful meringue. Part of the joy of a pavlova is having that satisfying ‘CRUNCH’ of the outer crisp shell break away to reveal the marshmallow-like soft pillow of meringue inside—and when the weight of the layers has already crushed that shell, you kind of miss out on all that magic. So, I updated it to be a nice big solid single layer of pavlova goodness.

Aside from some quantity adjustments, the blackberry pavlova recipe held up *very* well and was just as insanely delicious as I’d remembered it being. Something about that sweet tannic blackberry flavor paired with the spiced, almost floral, flavor of ground cardamom creates an unforgettable duo. It’s encouraging my mind to go all a-flutter with more ways to incorporate cardamom and blackberry together…from pastry swirl buns to fruity crumble bars, it looks like I have quite the blackberry season ahead of me!


Blackberry Pavlova with Cardamom
Ingredients
Blackberry Jam
- 8 ounces blackberries fresh or frozen
- 1/3 cup granulated sugar
- 2 tablespoons honey
- 1 teaspoon freshly squeezed lemon juice
- 1/2 teaspoon freshly grated lemon zest
- 1/4 teaspoon ground cardamom
Cardamom Pavlova
- 2 teaspoons cornstarch
- 2 teaspoons lemon juice
- 5 egg whites
- 1 1/2 cups superfine sugar
- 1 teaspoon vanilla extract
- 1/2 teaspoon cardamom
Blackberry Whipped Cream
- 8 ounces heavy whipping cream
- 2 tablespoons powdered sugar
- 1/4 teaspoon ground cardamom
- 1/4 teaspoon lemon zest
- 2 teaspoons blackberry reduction
- 1/2 teaspoon vanilla extract
Garnish
- 3/4 cup fresh blackberries
- 3/4 cup fresh blueberries
- 2 tablespoons honey
Instructions
Blackberry Jam
-
Heat the blackberries with 2 teaspoons of water in a medium-sized pot over medium heat, stirring every few minutes until they soften and break apart, using the end of your stirring spoon to help crush them. Lower the heat and allow the mixture to simmer for 15 minutes. Remove 2 teaspoons of the blackberry reduction mixture and set it aside. Stir in the sugar, honey, and lemon juice and allow the blackberry jam mixture to continue simmering over low heat until thickened, about 20 minutes, stirring every 5 minutes or so. Remove from heat, stir in the lemon zest and cardamom, and allow to cool to room temperature then refrigerate.
Cardamom Pavlova
-
In a small bowl or cup, whisk together the cornstarch and lemon juice until combined. Set aside.
-
Preheat the oven to 250 degrees Fahrenheit. In the bowl of an electric mixer fitted with the whisk attachment, beat the egg whites at low speed, gradually increasing the speed to medium. When the whites start to hold soft peaks, you can begin adding the sugar 2 tablespoons at a time, and wait until that sugar has dissolved before you add next couple tablespoons. Continue beating until glossy, satiny peaks begin to form. This whole process will take about 15 minutes. Do NOT beat the egg whites at too high of a speed.
-
Add the cornstarch mixture to meringue mixture and beat for another minute until cornstarch mixture is incorporated, then fold in the vanilla extract and the ground cardamom.
-
Trace an 8-inch circle on a piece of parchment paper, then flip it upside down and place it on a baking sheet down so the traced side won't touch the meringue. Lift up each corner of the parchment paper and dab a small teaspoon-sized blob of meringue on the corner of a large baking sheet, then press the parchment paper back down firmly onto the bit of meringue (doing this on each of the four corners of the baking sheet will keep the parchment paper from sliding around while you spread your pavlova shape).
-
Using a rubber spatula, spread the remaining meringue into an 8-inch circle shape using the tracing to guide you. Try to make the edges of the pavlova slightly higher than the center to allow space for the toppings later on. Use an offset spatula to make vertical lines around the edge of the pavlova, starting your offset spatula at the bottom of the pavlova and then lifting straight up, and repeating all the way around the edges of the pavlova (optional).
-
Place the pan in the oven, reduce the temperature to 225 degrees Fahrenheit and bake for 90 minutes, or until the meringue is crisp on the outside and easily lifts off the parchment. Turn off the oven and allow the pavlova to cool to room temperature over several hours. Pavlovas will deflate and collapse if cooled too quickly. Once cooled, remove the pavlova from the oven.
-
If your pavlova has cracks, do not fret. If any part looks like it may crack off after cooling, just gently press it back into place (the toppings will help hide any large cracks on the top).
Blackberry Whipped Cream
-
To make the whipped cream, beat whipping cream, sugar and cardamom until lightly fluffy and smooth and holds soft peaks. Then add lemon zest, blackberry reduction and vanilla and beat on low speed until it's combined thoroughly but be careful to not over beat!
Assembly
-
To assemble the pavlova, place the pavlova on a serving plate. Spread the blackberry whipped cream on top of it, then the blackberry jam. To garnish, arrange some of the fresh blackberries and blueberries on top and drizzle with the honey. Serve immediately and enjoy!


This Recipe was Based on a post from 2012, You Can See the Original Image Below!
No one starts being an expert at anything from the get-go 🙂 If you want to learn all about photography, styling, + branding to take your photos from that ↓ to this ↑, check out my online photography + styling courses!


This recipe looks amazing! I can’t wait to try it, and with the cool fall weather rolling in I think it will hit the spot! ?
temple run 2
Eva, pavlova is one of my favorite sweets.
I love to see the evolution of photography, as you say, nobody starts out being an expert.
Hello, thanks you for the perfect recipe !
Can you please tell me where did you find your beautiful cake stand ?
This cake looks amazing and I’m set to try it out next weekend. It would be nice to also have a shot of the pavlova once cut. I’m trying to imagine how thick the merengue is in the middle – i.e. how high the sides are vs. the center.I’ve only ever made stacked merengue cakes in the past.
Do you make the blackberry reduction?
Gorgeous blackberry pavlova. Looks so delicious. Perfect for this Sunday gathering with my family. Many thanks.
https://spanishclub.blog/
this looks amazing , i could kill to have a piece,,i will make my sister to do it.
Hi it says put the pan in the oven? What pan?
This was a hit! Easy to make and and assemble, and tasted fabulous. Will be making this again!
BEAUTIFUL! Looks delicious. I can’t wait to try this Pavlova
How do you get the side of the Pavlova so high with out them cracking or crumbling?
Is there a video of this recipe. Would help a ton!
Wish I had asked this before I put it in the oven, but do you mean bake for 2.5 hours (aka “1 hour and 90 minutes”) or bake for 1 hour TO 1.5 hours? Thanks!
Hi Lisa! You should bake it for 90 minutes 👍
Omg! Your recipes are amazing! I’m literally foaming at the mouth to try them all!!!
Aw you are so sweet Lori!!! I can’t wait for you to dive into them!! 😀
“Bake for 1hour and 90 minutes”? That’s gotta be a typo, right?
Nope, pavlova take a loooong time to bake at a loooow temperature. It’s the best way to avoid cracking and collapsing of the fragile meringue base 👍
Thoroughly enjoyed baking. Next time I will cut back on the sweetness. Likely by eliminating the jam, or cutting back on the amount of jam and also cutting back on the sugar and honey I add to the jam. Also, as earlier comments suggested, step 6 in the recipe currently reads the cooking time should be “1 hour 90 minutes” — this should be edited and changed to 1 hour and 30 minutes.
Thanks so much for the head’s up, Keith!!! I totally misunderstood the other comment and thought it was a confirmation of the 90 minute cook time. I’ve updated the recipe as such, thank you again!
Ora la proviamo a fare. Le foto sono stupende
I made this today with much assistance from my favorite 9-year-old. Neither of us had tried pavlova before. Just browsing Pinterest to find something to make together and we were so drawn in by the gorgeous photo. It was easy to do and turned out beautifully. The flavor combination in this desert is outstanding! Rave reviews from all five taste testers. We had seconds.
Awww I’m SO happy to hear that it went perfectly!! Which is very impressive as a first-time pavlova maker! Isn’t the texture just out of this world? I love the marshmallow-y center and the crunchy outside. Just the tastiest treat! <3
Yes, everything about it tastes as gorgeous as it looks! Made it again for company tonight, and next up…book club! I also appreciate that it’s something I can have on a keto diet. This time I used the powdered version of “Nature’s Besti” (Wholesome Yum brand allulose/Monk Fruit sweetener), and omitted the honey. Worked perfectly. I think the sweetener caused the crust to turn orange – I thought it was browning/overdone but still had 30 min to bake. So I moved it to lower rack & shielded it with foil. Wasn’t a problem. Tasted great & wasn’t overdone.
Your site is by far the MOST beautiful site I have ever seen. You are extremely gifted. I am sure everything tastes are glorious as it looks. Thank you for sharing your talents with all of us.
Esta receta se ve deliciosa
Gracias por compartirlo
Let's Be Penpals!
from my homestead to your inbox