


I know I haven’t mentioned the kitchen remodel very much recently, and that’s because it’s been going very, verrrry slowly. A couple weeks ago Jeremy was pulling up the old linoleum flooring and foundeven olderorange and brown-flowered vinyl flooring underneath (hello,1970.) We had a good laugh about it until I googled old flooring under existing flooring out of curiosity and realized that it was left in place because it was likely asbestos-filled vinyl, which you should not remove unless absolutely necessary. Luckily, Jeremy hadn’t started ripping out the vinyl floor quite yet so we didn’t have any asbestos floating around, but it delayed the whole process by a few weeks. And we bit the bullet and finally took the oven and stove top range out of the kitchen (literally the last thing we demo-ed from the kitchen) so it’s officially just a big empty room.
So that’s the state of affairs with the kitchen currently, and if all goes according to plan, it should be totally done (and by that I mean cooking-friendly) by the end of the month. Huzzah! But that means another 3 weeks without a kitchen, so what’s a food-obsessed lady to do? Well, if that lady is also as ridiculously obsessed with plants, it means a whooooole lot of gardening. There’s just something about plants that’s always relaxed me. I don’t know if it’s the feeling of soil between my fingers, the sun’s rays on my back, or just the natural endorphins that come with working up a hard-earned sweat, but when I’m out tilling the soil I just feel irrevocably and unequivocally at peace. There have been a few plant-centric crafts I’ve been wanting to try my hand at, and I’m going to be sharing them here over the next couple weeks while the kitchen is in flux. I hope you enjoy the coming posts and get the same sense of peace and relaxation that I do if you try your hand at them. Also, I’d love to see how yours turn out, so if you give it a whirl let me know or tag me in your instagram photo so I can take a peek at your lovely handiwork!


Wall Mounted Staghorn Fern
Ingredients
Wall Mounted Staghorn Fern
- 1 staghorn fern
- 1 block of wood about 2 inches thick, large enough for the fern to be mounted with extra space for empty wood to show around it
- damp sheet moss about 1-2 sheets depending on the size of the fern
- 10 1-inch nails
- steel wire
- fishing wire or garden twine
- quality potting soil rinsed and drained so that it is damp like wet sand
Instructions
-
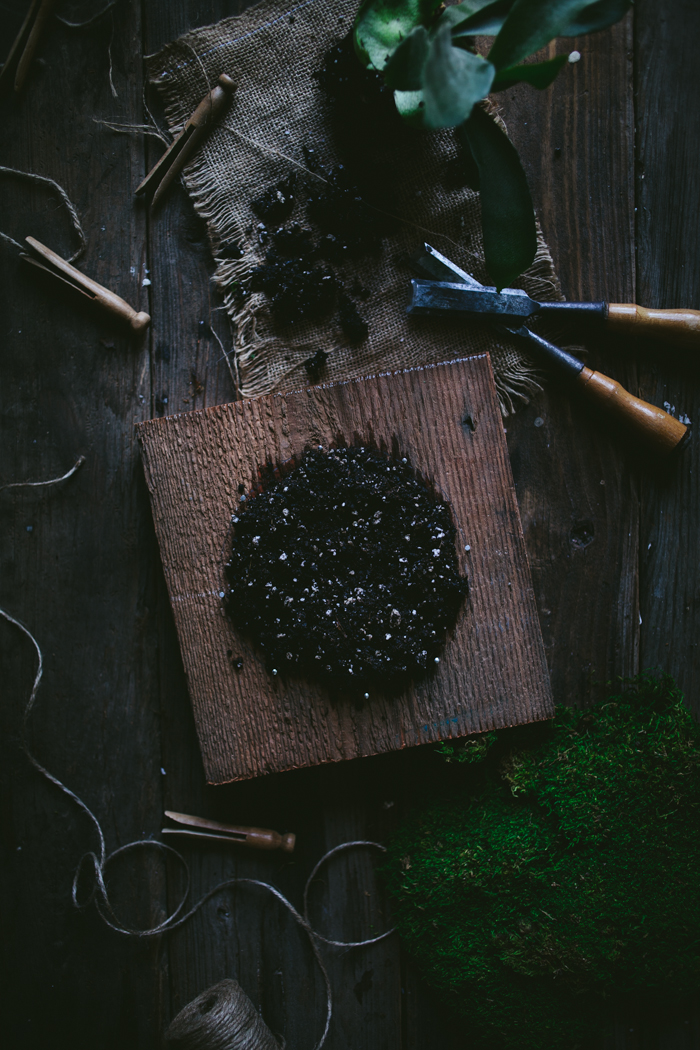
Use a plate to trace a circle onto the block of wood with a pencil. The size of the plate should be the same size as the area you want the moss to cover. This will be the front of the wood block.
-
On the back of the wood block, hammer two nails on the same plane about 5 inches apart, leaving 1/4 inch of the nail head exposed. Tie the steel wire to each exposed nail head. This is the backing you will use to eventually hang the mounted fern on the wall.
-
Flip the wood block over again to the traced circle side. Hammer the remaining 8 nails into the board along the border of the circle you traced, leaving 1/4 inch of the nail head exposed, trying to space them out as evenly as possible.
-
Once all the nails have been hammered, place a 1/2-inch thick layer of potting soil inside the circle, patting it so that it has a nice and even surface.
-
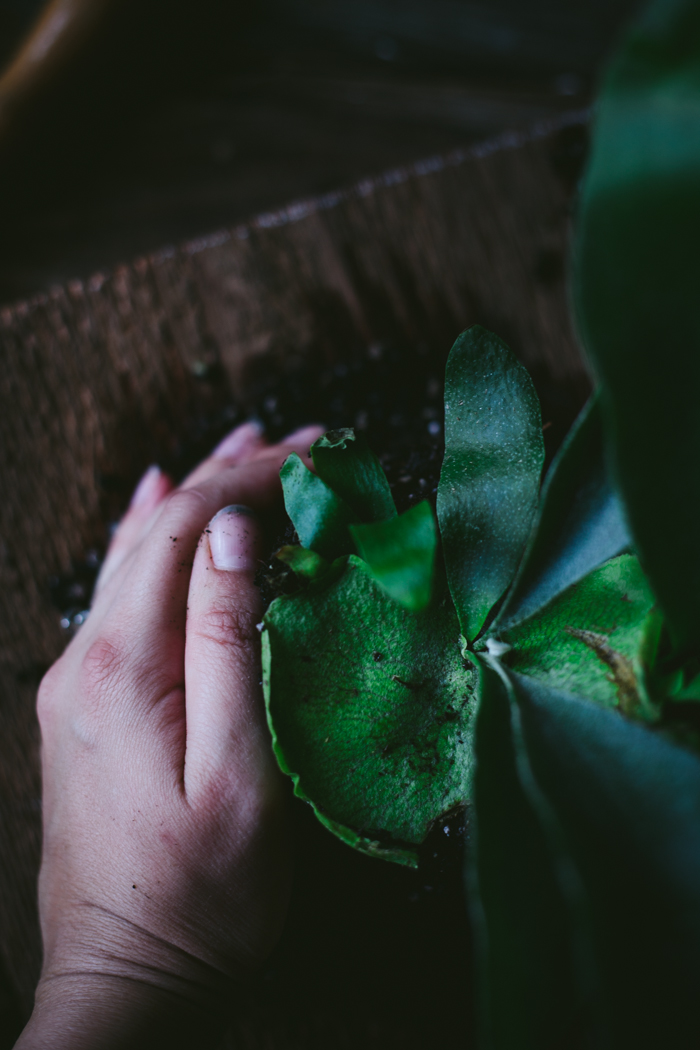
Remove the fern from the container it's currently housed in, and very gently remove some of the excess soil from the very bottom of the fern's root area so that the roots are a little looser at the ends.
-
Place the fern in the center of the circle. Holding the fern in place with one hand, get a handful of wet soil with the other hand, and start to pat extra soil around the fern like you're making a sandcastle, so that it has at least 1 inch of extra soil around it on all sides. Adding a bit of extra soil is important because it will give your fern room to grow, if you don't add any extra soil it won't have anywhere new for the roots to grow.
-
Once you've packed an adequate amount of soil around the fern, start tearing off pieces of the sheet moss and placing them on top of the exposed soil until it is covered with moss.
-
Now comes the string part. You can use either fishing wire for an invisible brace or gardening twine if you want a rustic, earthy look and want the bracing to be visible. Tie one end of the string to a nail head and wrap it around the moss-covered base of the fern. Make sure the string is taught, then tie the other end to one of the other nail heads. Repeat this until the moss is adequately held in place and the fern holds steady when you hold the wood base vertically as if it was hung from the wall. Adjust/add moss to cover any areas where the fishing wire is especially visible.
-
Gently shake off the extra soil and allow the wood block to dry completely (it will get a bit wet from the damp soil and moss) before hanging on a wall in your home.
-
Long-Term Care
-
Staghorn ferns thrive in bright indirect light. They should be watered about once a week, or if the soil feels dry if you insert a clean pinky finger between layers of moss to touch the soil. To water, place the mounted fern in the sink and pour cold water over the mossy and soil area, taking care *not* to splash water on the leaves. Allow the excess water to drain off in the sink, then set it in an area with good air circulation and allow the wooden mount to dry off before hanging it back on the wall again.
-
The biggest threat to the health of stag horn ferns is a fungus called black spot. You can avoid infecting the plant with the fungal disease by placing it in an area with low humidity and making sure to keep the leaves dry (i.e. don't splash lots of water on them when watering the plant, and it you do, gently wipe it away with a paper towel or clean cloth).
-
To keep your fern looking as lush and green as possible, fertilize it once a month with a mild 1-1-1 water soluble fertilizer.


This is lovely! And I cannot wait to see your new kitchen!!
Sues
Thanks so much Sues! I can't hardly wait 🙂
This is so lovely! I'm also obsessed with air plants at the moment and making little things to hang/display them. I haven't tried anything more lush yet, like a fern. Now I'm inspired! I guess being forced to have time for other projects is a happy outcome of slow kitchen remodeling!
Oh air plants are great too! I've started a small collection of them and they're just incredible, there's so many fun ways to display them around the house. I'm going to try my hand at mounting them on a piece of driftwood to hang on the wall, I've seen it a couple times before and it always looks so neat!
Love this Eva.
I hope that this next couple of weeks will go by super fast and you'll have your new and beautiful kitchen very soon. 🙂
Thank you, Ice! It will be so, SO nice once it's all done and I can get back to cooking in the kitchen again 🙂
I bought a staghorn awhile back but had such a hard time keeping it alive in the Midwest winter we had last year. This post is making me want to try it again though! Good luck with your kitchen redo – sounds like lots of fun and LOTS of hard work. : )
Thank you Shelly!! Yes a cold winter can be hard on a fern, you could always try growing it indoors this winter, ferns make great indoor plants since they don't need any direct sunlight. And they're always such a beautiful shade of green 🙂
Hi it’s me, I am also visiting this website regularly, this web page is in fact fastidious and
the users are genuinely sharing pleasant thoughts.
Fantastic blog yyou hwve here but I was wondering if you knew of any discussion boards that coverr the
same topics talked about in this article? I’d really like to
be a part of online community where I can get feedback
rom other experienced individuals that share the same interest.
If you havge any suggestions, please let mme know.
Bless you!
I do accept as true with all of the ideas you have offered
to your post. They’re very convincing and will certainly
work. Nonetheless, the posts are very short for starters.
May just you please lengthen them a bit from next time?
Thanks for the post.
This is so lovely ~ I wish there was a place like this. You are good and smart. Wish you luck and more success good
Let's Be Penpals!
from my homestead to your inbox